Friday, August 23, 2013

Return of the Nerd - Delicate Manicure

HOO BOY! I've been absent from the nail scene for quite a while now haven't I? I apologize for the unofficial hiatus from blogging, it was quite unintentional, and I intend to be a good girl and blog more regularly from now on.

The good news is that in all the time I was gone I was painting and picture taking, so I have quite a few swatches and manis stored up! So without further adieu, here's a brand new manicure and how I did it!

(Note, this manicure was done a few months ago and I may be a little hazy on how I did this, though it's a simple process.)


This is a mixture of gradient and an attempt at a jelly sandwich that resulted in a sweet, delicate looking manicure. I could easily see this being used in a formal setting. What's fun is it's pretty easy to do! So click the jump to see more photos and a short tutorial on how I did it!


Wednesday, June 5, 2013

Blood on the Pages - Bloody Manicure

Hey there Internet Peoples!

Sorry I haven't been around as of late, life just kind of got in the way of making a proper Blog post. Never fear, though! I have indeed been painting my nails and taking photos of them! I have quite the back-log too, so hopefully I'll be able to post once a day for a while....Depending upon how lazy I feel.

First up we have my horror novel inspired nails! Complete with tutorial.

I like to write fiction, and have more half done starters for horror novellas laying about on hard drives than I'd like to admit to. So when I was looking through different manicure styles for ideas and saw the always elegant Newspaper Print my brain naturally thought "That would look better...bloody!"
My brain is twisted...And likes to pause for dramatic effect.


Pretty cool right?


After finding a very helpful tutorial on YouTube ( As can be seen here) on blood splatter I was off! More pictures after the cut and I'll tell you how you, too, can have a bloody good manicure!

Get it? Bloody good? Oh never mind...


Wednesday, April 3, 2013

Pro FX Fast Dry High Gloss Topcoat

I thought I'd make a post about this topcoat I've had in my collection since Christmas. Normally I use INM Out The Door top coat for my swatches, but in all honesty I have every intention of removing my current mani in a couple of day's time and INM isn't exactly free. So I thought it'd be a good time to share with you the topcoat I use to keep my manicure's looking fresh throughout the week after taking my swatch photos:


Pro FX Fast Dry High Gloss Top Coat. For the longest time after receiving it as a Christmas present this was my go-to top coat, and I quite liked it. I've read a few reviews comparing it to Seche Vite, considering it's a thick, quick drying top coat. One of the differing factors is the value. See that big bottle? At Wal*Mart this baby qill run you four dollars and some change. And it does what it says it'll do. It dries very hard very quickly and shines like a Stephine Meyer vampire at the beach. I actually prefer this to Seche Vite as I've had some terrible experiences with Vite, namely my manicure coming off in nail sized chunks one day after application and more shrinkage than a Hobbit at Willy Wonka's factory.

Th only issue I've had with this is that when I first started using it I'd notice bubbles. Not a whole load of them, mind you, but it still bubbled. Hence why I use INM Out The Door for my swatching photos.  Some sort of an attempt to look as professional as I can ^^;

However, a short while ago I was reminded of the way you have to apply Seche Vite - In a thick bead and don't overwork. Considering the two are very similar in formula, I gave that a try with the Pro FX and viola! No bubbles! I wish some of the reviews I'd read in the beginning would have mentioned that ._.

So yes, I whole heartedly suggest  giving this top coat a try. For the quantity and the formula it really can't be beat, though yo do have to baby it a little. Don't shake it as it's very prone to forming bubbles in the bottle. For the same reason, don't dunk the brush into it too quickly. And apply thicker than you'll think you need to and don't overwork it. In other words - be careful and this top coat will be your best friend xD

The Pro FX brand can be found in Wal*Mart's nail care isle. They've got an entire range of nail products, from base coats, top coats and treatments. I have their Apricot Cuticle Oil and it works like a dream. And from what I've seen everything in their line ranges from four-fifty to five bucks for theses "salon size" bottles.

'Til next time!

-
Nerdy

Wet'N'Wild Fergie Collection - Glowstick

I was sorely tempted to call this post "An Unexpected Manicure," as that's precisely what it is. I woke up this morning and had the pudding scared out of me when I looked down and saw a full nail sized chunk of my Sakura Blossom manicure laying on the bed. After making sure my nail hadn't fell off (and noting some damage had been done to the poor nail) I realized it was time for a new manicure as I had to go out today and there was no way I was going out with one of my nails a grody mess. I had several mani's planned, though all of them required some time to do properly and I needed something done fast - That's when I realized I had a bottle of untried polish that was perfect for spring/summer/warm weather!
Cue the Angel's singing and break out the base coat!


Swatch and review after the jump!


Thursday, March 28, 2013

Of personal notes and Puppydog Birthdays

I just thought I'd date a second to mention that today was my little baby boy's birthday! My little Moogle turned four years old, and I'm the proudest Puppymother ever.


My baby is also a Diva and likes to strike a pose/persona for the camera, when I can get him to actually look act the camera.

Spring Gradient Sakura Blossom Manicure

Hello, Internet Peoples!

Spring is one of my favorite seasons (Autumn being my second favorite) and I've been trying to think of a happy *~*~*Spring*~*~* manicure that didn't involve pastels as I seem to simply not be a pastel person .-. I like sparkles and vivid, rich colors. However most spring manicures are pastel creams that, while are lovely, are not just me. Suddenly I remembered that in Japan, the Sakura Blossom is a symbol of spring! But what to pair with those pretty blossoms? Well, that's when I went to Google and found this image:


After that everything fell into place. I raided my box o' polish, sat and took two hours of painting and sitting and letting every bloody coat dry (while listening to JRock, fittingly enough), admired the results once I was done... And then had to do dishes. Of course my topcoat was dry by that time but it didn't do any good for the rest of my hands. "Nothing some hand cream can't take care of" I thought. And just to make sure the pictures came out super sparkly pretty, I put on some more top coat juuuust before taking the pictures. In the view finder the pictures turned out great...Until I loaded them onto my laptop and saw my cuticles.
Guys, I'm apologizing for my cuticles right now.

Manicure pictures and  how I did it after the jump!


Base Coat: Seche Natural
Top Coat: INM Out The Door

How I did it:
Firstly, allow me to show you the picture I took of my workspace. My iPod's camera lense was slightly dirty so forgive the quality. Also - No. I am not that tan, but compared to the white polish and paper, along with our light bulb going yellow, I appear rather golden brown o.o


  • SO! To start layer down base coat. Because Base coat is our friend.
  • Applied two coats of Sally Hansen Hard As Nails in White On, waiting five minutes between coats to let them dry.
  •  Applied a coat of China Glaze's Fairy Dust. I love this glitter, by the way. Let that dry.
  • Ripped a cosmetic sponge in half and with the rough edge of the smaller half sponged a mixture of Sally Hansen Hard As Nails in Petite Pink and L'Oreal Color Riche in I Pink I'm In Love several times halfway up the nail. The mixture was very transparent and it took several layers to even make a dent in the white. I'd suggest a more opaque pink next time.
  • After that dried I sponged CoverGirl Outlast Stay Brilliant in Grapevine a third of the way up. Let that dry.
  • Grapevine I messily wrapped my tips and added a dot to the center of my nail and sponged that around to make the tips the most opaque.
  • Sponged some Fairy Dust over Grapevine only.
  • With a black striper (I have one from Sinful Colors that I'd found in Walgreens but even a thin brush in black polish will do as long as you can make a thin line) I drew on the limbs, trying to make them as wispy and non-repetitive as I could, leaving room between the branches to dot on the blossoms.
  • With differing sizes of dotting tools I dotted on thick'ish dots of I Pink I'm In Love in a more or less triangle shape. I do wish I'd used a bolder color as the petals disappeared kind of >.<
  • With White On and a smaller dotting tool I put a white dot in the center of each triangle.
  • With an even smaller too (My set came in five double ended tools) I put a dot of Pure Ice's Crimson, an with the smallest tool in the set tried to mar it around so it'd blend in with the white.
  • I think let them babies dry a very long time. I've found out the hard way that slapping on topcoat right away will ruin the work and reduce myself to a bag of colorful and nonsensical curse words.
  • Applied a thick bead of quick dry topcoat. I've found applying it thickly leads to less streaking
  • Admired the pretty! (Then freaked out at the amount of time it took)

 Wow...I think that was my first tutorial O.O

I'm sure I'll do the Sakura Blossoms again before warm weather's over (and in this part of the states? It'll be here a loooong time., but I think next time for the blossoms I'll use a bolder pink. I wish I'd have broke out my bottle of China Glaze's Awakening for this actually ^^; Otherwise? I'm happier with this manicure than I should be. I hope you guys liked it too :-)


'Til next time!

-
 Nerdy

Monday, March 18, 2013

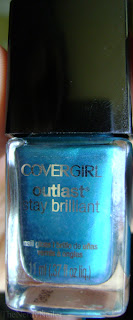
CoverGirl Outlast Stay Brilliant's Constant Caribbean

Go Topless, We Dare you!

That's CoverGirl's new tagline for these polishes. (The polishes, dears, so lower those shirts! :0) ), claiming that these babies will shine just as well and last just as long without a topcoat. A bold claim indeed, especially to a topcoat lover like myself. However, I'm a sucker for a dare, so when CVS offered me a buy-one-get-one I decided to give it a try. The color selection is decent, though there's nothing outrageously fantastic about them either. I grabbed Constant Caribbean and Grapevine meaning to pair them up in a half-moon mani. Sadly I seem to always do my nails when I'm in a hurry as of late so I stuck with Constant Caribbean.


Swatch and review after the jump!


Rimmel Kate Moss Lasting Finish Matte Lipstick in 111 (Kiss Of Life)

This post is full of firsts. My first lipstick review of my first matte lipstick. First fistity-first-first!

I've been seeing these lipsticks around for a while now and had always been a little curious about them. My preferred lipsticks are Maybelline's Color Sensational collection and Revlon's ColorBurst Lip Butters, so when I read 'Matte' on the display I was instantly intrigued and slightly wary as it was a step away from my norm. Finally after reading some positive reviews and seeing some interesting swatches, I decided to take the plunge.


Pretty tube, interesting name (And the only named color in the line that I saw.) So an A on packaging from me!

Swatch photo and review after the jump!


Spring Manicure with Sally Hansen's Mint Sorbet

About a week and a half ago the weather here in Arizona started warming up (which is a bit of a joke as we're warm here all year 'round, but when you live here for a while you get acclimated to our brand of hot and 'cold'), which reminded me that we were due for spring soon. As result I wound up deciding to try my hand at a pastel creme manicure. Thing is? I own no pastels, nor do I own any creams other than a black creme. I'm a shimmer girl after all :-) Luckily (I think) that day I found myself in Walgreens and decided to pick up a bottle of Sally Hansen's Mint Sorbet.


My review and mani pics are after the jump!


Tuesday, March 12, 2013

Nail Whitening Saga - Denture Tablets

Hello internet peoples! :-)

It's a new installment to the Nail Whitening Saga! After my dissapointment with Orly's Cutiqe (as a whitener, mind you. As a cuticle softener it's great) I decided I'd resort to my most preferred method of remedies - The at home kind xD

I'd heard from several different websites the miracles of denture whitening tablets for nail whitening. Having also read they work as a jewelry cleaner I finally decided to go grab me a box. What were my findings?

Naked nails and results after the jump!